Tips for Yeast Doughs (from ourbestbites.com)

A lot of people are scared of making things that have yeast in them. They CAN be scary, but they’re also lots of fun and very rewarding. Here are some tips to make perfect yeast doughs:
Use bread machine yeast rather than regular yeast, even if you’re not using a bread machine. It’s less tempermental and more forgiving.
Make sure the liquid you’re using to dissolve the yeast is warm enough (between 100-115) for the yeast to grow, but not too hot because that will kill the yeast. My rule of thumb is a temperature that you’d be comfortable taking a hot shower in, but not so hot that you couldn’t wash your hair or face in it.
Keep your yeast in the freezer; it will last longer.
Keep your kitchen warmer than you normally would.
Sugar feeds yeast, salt can kill it. This is part of why you let yeast dissolve and rise before adding it to other ingredients–it activates the yeast enough to a point where the salt won’t kill it. If you’re having a hard time getting your yeast to bubble, add a little sugar.
Allow dough to rise in a metal or glass bowl. They retain heat better than plastic bowls and you’ll get a better rise. You can also run the bowl you’re using under some hot water (and then dry it, then spray it with non-stick cooking spray for easy cleanup) before adding the dough so it will be nice and warm.
Be patient. Yeast breads can take a long time.
You’ll use more flour if you’re kneading with your hands than you will with a Bosch or a Kitchenaid.
A soft dough will firm up as it rises the first time, so try not to add too much flour. It’s better to err on the side of not adding enough flour than adding too much–you can always add more flour, but you can’t take it away once it’s in the dough.
Butter on top of the dough will make it soft; olive oil will make it crispy.
Shortening can make lighter, fluffier breads, but butter tastes infinitely better. Nine times out of ten, go for the butter.

Everyday Cinnamon Rolls (from ourbestbites.com)
Adapted by Our Best Bites from Allrecipes
Dough:
1 cup milk
4 Tbs butter, cut into chunks
3 1/4 – 3 1/2 cups all-purpose flour, divided
1 (.25 ounce) package instant or ‘rapid rise’ yeast (about 2 1/4 tsp)
1/4 cup white sugar
1/2 teaspoon salt
1 egg
Filling:
1 cup brown sugar, packed
1 1/2 tablespoon ground cinnamon
1/2 cup butter, softened
Icing:
1 1/2 C powdered sugar
2 T melted butter
1/2 tsp vanilla
1-2 Tbs milk
Dough: Place milk and 4 Tbs butter in a microwave safe bowl.
Heat on high for 1 minute 30 seconds. Butter should be at least partially melted. Stir and set aside.
In a large mixing bowl whisk together 2 C flour, yeast, white sugar, and salt. When milk mixture has cooled to warm (not hot) add it to the flour mixture along with the egg while the beater (paddle attachment for those using a stand mixer) is running.
Beat until well combined, about 1 minute. (Switch to the dough hook now) Add remaining flour only until dough barely leaves the sides of the bowl. It should be very soft and slightly sticky.
Continue to let the dough knead for 5 minutes. If you are not using a stand mixer, turn dough out onto floured surface and knead for 5 minutes by hand.
Turn dough out onto a floured surface and let rest for about 10 minutes while you make the filling.

Filling: make sure butter is softened well. Mix with brown sugar and cinnamon.
Assembly: Roll dough into a rectangle about 12 x 14 inches. Spread brown sugar mixture (it will be slightly thick, you might have to “crumble” it) over the surface and use your fingers or the back of a spoon to gently spread around.
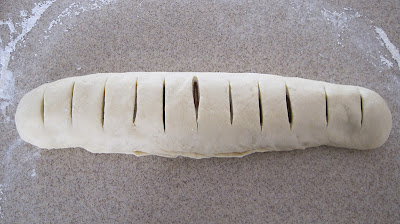
 Roll up from the longer side of the rectangle and pinch edges closed. Score the roll into 12 equal pieces and then cut into rolls. Place in a 9 x 13 pan that has been sprayed with cooking spray.

Cover pan with a clean towel and let rise in a warm place for about 30 minutes. In the mean time, preheat oven to 350 degrees.

Cover pan with a clean towel and let rise in a warm place for about 30 minutes. In the mean time, preheat oven to 350 degrees.
When rolls have finished rising bake for 15-20 minutes or until light golden brown. If desired spread with icing while still warm. Makes 12 rolls.

Tips:

Tips:
A lot of bread recipes call for scalding the milk. It’s partially to be warm and activate the yeast, but there’s also a really long scientific explanation that involves molecules and protein structures and stuff.
I ignore all of that and just toss the milk and butter in the microwave. But here’s my tip: The recipe calls for 1 C of milk. Save 1/4 cup of that and leave it cold. That way after the butter is melted and the milk is hot you won’t have to wait forever for it to cool off enough to use. Add the cold milk and it will bring the temp down.
Don’t add too much flour! It took me a long time to figure this out. It wasn’t until one day after I was newly married and I actually watched my friend and cinnamon roll guru LeeAnn actually make them that I realized just how soft cinnamon roll dough should be. It seems like it would even be too soft to roll out, but when you gently dump it on a well floured surface it works just fine. Remember that a soft tender dough results in soft tender rolls. Too much flour and your rolls will be dense and dry.
Cutting tip: If you want even sized rolls start from the middle. So for 12 rolls, divide evenly in the middle and then divide each of the halves into thirds, and then into thirds again.
Rising tip: Heat a small bowl of water in the microwave until it boils. Open the door, quickly move the bowl aside and set the pan of rolls in and shut the door (with the microwave off). Just let them sit in there to rise. The hot water will warm up the temp, and also keep the dough moist.
Bake the rolls to just be barely golden brown. I watch the centers- as soon as the centers are set and not dough-y they’re good to go.

Great tips! Thanks Inger!
No comments:
Post a Comment